
Showing posts with label Ubuntu. Show all posts

Wednesday, January 09, 2008

DMA and Ubuntu

One of my readers is having a bit of a hard time with DVD playback, after reading my article:
Playing Encrypted DVD's in Ubuntu 7.10, he has been unable to get dvd's to playback smoothly.

One really common solution to slow, jerky, and unreliable playback is turning on DMA.
DMA stands for: Direct Memory Access. DMA allows a piece of hardware to talk directly with the RAM, reading and/or writing independent of the CPU (Central Processing Unit). In other words the hardware can use the system memory, bypassing the CPU, allowing the device to read and write much faster.

By default Ubuntu has DMA turned off (set to 0), this can be changed in the /etc/hdparm.conf file, like so:

  1. First make a backup of your hdpram file:# sudo cp /etc/hdparm.conf /etc/hdparm.conf.bak
  2. Now edit the file using your favourite text editor, I'm using gedit, however you can use the editor of you choice just change the following command to suit your needs: # sudo gedit /etc/hdparm.conf
  3. Once the file is open you will need to add the following at the end of the file:/dev/cdrom {
    dma = on
    }
  4. Once you restart your computer you should have DMA turned on.

Troubleshooting
I have been reading about a number of problems with turning DMA on. Here are a couple of solutions if DMA still doesn't work after trying the instructions above:
First try re-editing the hdpram.conf file to read /dev/dvd instead of /dev/cdrom, then restart the computer.
If you are getting the error:
`HDIO set dma failed: operation not permitted'
You may need to edit your /etc/modules.conf file, for more information please see this forum thread: #post93238.
Personally none of my systems have these issues so I can't test this solution.

I hope this proves useful to someone, have fun.

No More Beeping

*NIX Quick Tip

Beep, beep, beep,
If your like me and don't like auditory reminders, you can turning off the beeping quickly and easily:

X Windows
If you want to disable beeps in X11 (X Windows), you can turn them off with the command:
# xset b off
*Note: you will need to login as root or use sudo.

csh and tcsh
You can disable csh and tcsh shell terminal beep if you put `set nobeep' (no quotes) in your ~/.cshrc file.

This options will work on most *nix systems (using csh/tcsh or X windows), including Ubuntu, FreeBSD, and OpenBSD, however I tested this solution using FreeBSD.

Sunday, December 02, 2007

Changing the Color Scheme in Gedit

Ubuntu Quick Tip
I find looking at a white background and black text a little daunting in Gedit, however in Ubuntu 7.10 (Gutsy Gibbon), you can easily change colour schemes and save your eyes. To change schemes:
In Gedit Go to Edit --> Preferences.
In the Preferences dialogue click on the Font & Colours Tab.
Then choose a scheme to suit you.

Friday, November 09, 2007

Installing New Usplash Themes in Ubuntu 7.10

There are many different looks you can give to your boot screen by adding more themes to usplash, the program which displays the splash image at boot time. You can install a number of them using Synaptic by doing a search for usplash. You can also download different themes online (see below).

Installing StartUp-Manager
Before playing with Usplash themes we need a way to easily switch between themes, enter StartUp-Manager, this program lets us control many aspects of Ubuntu's start-up including Usplash. You can install startupmanager via Synaptic or apt using the following line:
# sudo apt-get install startupmanager

Download Uspash theme
When I searched Gnome-look for Usplash I found a number of very nice themes: Usplash Themes at Gnome-Look. I quite like the Black Chrome theme. Once you have chosen one or two that you like, download them, and extract them from there archive: Right click on the archive .tar.gz and select Extract Here:

Installing Usplash Themes

  • Now we will run the StartUp-Manager to install and change usplash: System --> Administration --> StartUp-Manager
  • Go to the Appearance Tab at the top of the page, and click the Manage Usplash Themes button at the very bottom of the dialogue.
  • Now click the Add button and navigate to where you extracted your files, and select them, (They should be .so files).
  • Your new theme/s should now appear in the Themes list:
  • Close the Manage themes dialogue box.
Selecting your Usplash Theme
  • Once you have installed your themes they should appear in the scroll box under Usplash Themes in the Appearance Tab.
  • Select the theme you would like from the scroll box, just click on it and select.
  • Before you close the StartUp-Manager, check that the settings in the Boot Options Tab under Display are correct for your monitor. I had to change mine to Resolution: 1024x768, and Color Depth: 24 bits.
  • Once you have closed the StartUp-Manager wait until the post configuration has finished:When you shutdown and restart your computer you will be about to see the result, play around with a few different themes and see what you like, Have fun :-)

Wednesday, November 07, 2007

Installing Fonts in Ubuntu 7.10

Installing fonts in Ubuntu 7.10 (Gutsy Gibbon) can be done in a number of ways. Personally I like the following method, it's quick,simple and it works.

Installing some common fonts.
There are a number of very common fonts, which you can install through APT/Synaptic, including the Microsoft TrueType core fonts (e.g. Arial Black, Times New Roman).
Before installing, make sure you enable the extra repositories, (If your not sure how to do this please see: Repositories/Ubuntu).
Install the fonts:
# sudo apt-get install msttcorefonts texlive-fonts-extra
Installing Other fonts
You can also use many other fonts, like those downloaded from dafont.com. There are two options when installing: one to install them for a Single User, this means that only this user can use them, or installing them for System Wide use, so that every user on the system can use the fonts.

Single User:
Once you have downloaded and unpacked your font files (.ttf, .TTF), you will need to create a ~/.fonts if it doesn't exist.
$ mkdir ~/.fonts
Copy the font files to the .font directory:
$ cp *.ttf ~/.fonts
$ cp *.TTF ~/.fonts

Now we need tell the system about the new fonts:
$ fc-cache -f -v ~/.fonts
System Wide:
Once you have downloaded and unpacked your font files (.ttf, .TTF), we just need to move them to the font directory:
# sudo cp *.ttf /usr/local/share/fonts/
# sudo cp *.TTF /usr/local/share/fonts/

Run the following command to rebuild the font cache:
# sudo fc-cache -f -v

Saturday, November 03, 2007

Fix for No Splash in Ubuntu 7.10

After installing Ubuntu 7.10 there is no splash screen displayed at startup nor at shutdown. I just get a 'Signal Out of Range' message from my monitor.
A program called usplash controls this process, so I looked into it's configuration, the values were totally off for my monitor, which uses a resolution of: 1024x768.
By default the file looks like:
# Usplash configuration file
xres=1280
yres=1024

I edited the file:
# sudo gedit /etc/usplash.conf
I changed the xres to: xres=1024 and the yres to: yres=768.
Then I reconfigured the usplash program with the new settings:
# sudo dpkg-reconfigure usplash
Problem fixed, now the splash image displays both at startup and shutdown.

Tuesday, October 23, 2007

Turning off the Network Applet in Ubuntu

I'm not a fan of the networking applet (nm-applet) in the panel of Ubuntu. When I had a laptop and was moving networks all the time it was handy, but I'm using a desktop at the moment, and there is no easy way to turn it off. If you would like to remove it, then there are a couple of steps that you will need to follow.

  • Open the Sessions dialog; System --> Preferences --> Sessions
  • In the Startup Programs tab find the Network Manager option and untick the box.
  • Then go into the Current Sessions tab, and select the program which says 'nm-applet --sm-disable' (without quotes).
  • Click 'Remove', and then 'Apply'.
  • Now close the dialog (save if it asks you too).
  • Restart gdm (Gnome Display Manager); Close all open Applications, Then press Ctrl+Alt+Backspace.
Once you have restarted gdm the network applet will be gone.

Monday, October 22, 2007

Running Nautilus as Super User

Many times in Ubuntu I've needed to move a file, or add new data to a file only to find out that I don't have high enough permissions to do so. Normally this means hitting Alt+F2 to run a command and then typing # gksu nautilus, or in a terminal typing # sudo nautilus. However there is a trick I use, which makes things much easier.

I add a menu item which runs the gksu nautilus command, and it's really easy to do.

  1. Open System --> Preferences --> Main Menu.
  2. Select "System Tools" from the list of Menus
  3. Click the "New Item" button on the right hand side.
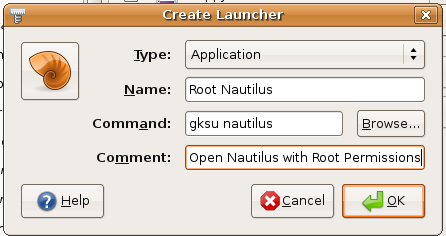
  4. The Create Launcher box will open, fill in the boxes like this:
  5. Now click OK, and close the Menu Editor.
  6. You should now be able to select: Applications --> System Tools --> Root Nautilus, fill in your password and have a full permissions with nautilus running as Super User.

Saturday, October 20, 2007

No Window Borders in Ubuntu 7.10

When running compiz on Ubuntu 7.10 using an nVidia graphics card, with the restricted nVidia drivers installed, I loose my window borders (titlebars). There is however a temporary fix, which works just fine for me:

First make a back-up of your xorg.conf file, even though the nvidia-xconfig program makes it's own backup, it's never a bad practice to backup your files before editing them:
# sudo cp /etc/X11/xorg.conf /etc/X11/xorg.conf.BAK
Now enable the nvida glx graphics using the following command:
# sudo nvidia-xconfig --add-argb-glx-visuals -d 24

Using X configuration file: "/etc/X11/xorg.conf".
Option "AddARGBGLXVisuals" "True" added to Screen "Default Screen".
Backed up file '/etc/X11/xorg.conf' as '/etc/X11/xorg.conf.backup'
New X configuration file written to '/etc/X11/xorg.conf'

Now shutdown your computer then start again, fully restarting the system you should be able to switch compiz to normal or extras with window borders.

Playing Encrypted DVD's in Ubuntu 7.10

If you would like to play encrypted DVD's in Ubuntu 7.10 (Gutsy Gibbon) you will need to install a couple of extras, to get everything working properly.

**Edit: 22/10/07
Playing DVD's using Totem
Totem is the default movie player for Ubuntu 7.10 therefore I'll show you how to play DVD's using totem first. If you would like to use another movie player please see below.
**End edit

*Please note: We have to make a bit of a compromise running the movie player: totem, because we're installing totem-xine. This means that the totem-gstreamer plugin will be unavailable to stream media in firefox.
However there are other firefox plugins, which can do the same task.


To enable DVD playback first enable the extra repositories, especially universe and mulitverse. (If your not sure how to do this please see: Repositories/Ubuntu).
Now we can install the following plugins and applications:
# sudo apt-get install libdvdread3 totem-xine libxine1-ffmpeg
# sudo /usr/share/doc/libdvdread3/install-css.sh

Once you have restarted your system you should be able to play DVD's using totem without a hitch.

*Edit: 22/10/07
Using Other Media Players
I just wanted to add a quick note about using other media players. There are a few other really good players that you can install in Ubuntu 7.10 (a.k.a. Gutsy Gibbon) and they aren't difficult to run once you have the right plugins. If you decided to use one of these instead of totem, you won't have to worry about losing the totem-gstreamer plugin for Firefox.

To play DVD's using VLC
Enable the extra repositories, especially universe and mulitverse. (If your not sure how to do this please see: Repositories/Ubuntu).
Now install the following plugins and applications:
# sudo apt-get install libdvdread3 libxine1-ffmpeg vlc
# sudo /usr/share/doc/libdvdread3/install-css.sh

Once you have restarted your system you should be able to play DVD's using vlc.

To play DVD's using MPlayer
Enable the extra repositories, especially universe and mulitverse. (If your not sure how to do this please see: Repositories/Ubuntu).
Now install the following plugins and applications:
# sudo apt-get install libdvdread3 libxine1-ffmpeg mplayer
# sudo /usr/share/doc/libdvdread3/install-css.sh

Once you have restarted your system you should be able to play DVD's using MPlayer.

To play DVD's using xine-ui
Enable the extra repositories, especially universe and mulitverse. (If your not sure how to do this please see: Repositories/Ubuntu).
Now install the following plugins and applications:
# sudo apt-get install libdvdread3 libxine1-ffmpeg xine-ui
# sudo /usr/share/doc/libdvdread3/install-css.sh

Once you have restarted your system you should be able to play DVD's using xine-ui.
*End edit

If you need more assistance please feel free to contact me, and I'll see what I can come up with.

Disclaimer: Please check the applicable copyright laws in your country before undertaking this modification to your system, as in some countries this may be illegal.

Sunday, October 14, 2007

Microphones and Skype on Ubuntu 7.10

I wrote a post a while back about getting Microphones and Skype working in Ubuntu. This has been one of my most viewed posts, and as Ubuntu 7.10 (Gutsy Gibbon) is about to be released, I thought I would update my previous post.

Turning on the Microphone
Getting the microphone working in Ubuntu 7.10, was really easy, I did the following:

  • Plugged the Microphone in.
  • Double clicked on the volume icon in the panel.
  • Clicked Edit then, Preferences.
  • Ticked the Microphone, Mic boost, and Capture boxes.
  • Once they were ticked a Recording/Capture tab and a Switches/Options tab appeared in the volume control panel.
  • I went through each volume setting and made sure nothing was turned down or muted.
  • In the Switches/Options tab select Mic Boost.
Done, the microphone worked just fine, I tested the Mic using the Sound Recorder tool found in: Applications -> Sound and Video -> Sound Recorder

Installing Skype
  • Add the Skype repository (If you don't know how to add repositories please see: Repositories/Ubuntu) deb http://download.skype.com/linux/repos/debian/ stable non-free
  • Reloaded or updated the package information
  • Install Skype: # sudo apt-get install skype
Security and Skype
I no longer have the need to use Skype, however there is a security problem with Skype running on Linux, for more information please see: http://forum.skype.com/index.php?showtopic=95261

I suggest using AppArmor, (which is now a default application on Ubuntu 7.10) to create a security profile for Skype.

Wednesday, July 25, 2007

Turning Ubuntu's Brown Eyes Blue

I mentioned in my post yesterday, that I've been having trouble looking at Ubuntu's orange theme.

The orange is wonderful for attracting people, for grabbing attention, and drawing you in and in these ways it certainly works. However looking at it all day can become a bit much.

There is a solution though. In the Ubuntu repositories there is a gnome theme called Blubuntu. Some elements of this theme I'm not keen on. Yet overall my eyes are thanking me.

Installing Blubuntu
It's really easy to make Ubuntu blue. First open Synaptic, and do a search for blubuntu.
As you can see here there are a number of results. I would suggest installing them all.
If you want to just install Blubuntu-theme you can.

*Note: If you only install the Blubuntu-theme then you only need to read: "Selecting the Blubuntu theme" below. The rest will not apply.

Once the packages have installed you need to select them as follows.

Selecting the Blubuntu theme

To select the blubuntu theme you need to go to System / Preferences / Theme:

Once the Theme Preferences dialogue is open you need to select Blubuntu from the list:

Now you have the blubuntu theme installed, you'll notice that your icons, selection colour, window borders and more has changed.

If you are unhappy with any part of this theme you can customise it further. To do this hit Customise on the side of the Theme Preferences dialogue.

Selecting the Login Window (GDM)
Selecting the Blubuntu login window is really easy. Just Go to System / Administration / Login Window. You will need to enter your password.

Select the local tab at the top of the dialogue box and then choose the "Blubuntu" theme (or another blue theme) from the selection. Make sure that the radio button is on.

You might also want to change the Background colour, in this dialogue box.
The Background colour is the colour that appears between the login window and the desktop being displaying. (Where the splash screen appears.)

Selecting the Splash screen
To change the splash screen you first need to open a terminal.
(There are other ways of doing this, yet this is the quickest.)

Then backup old splash image:
# sudo cp /usr/share/pixmaps/splash/ubuntu-splash.png /usr/share/pixmaps/splash/ubuntu-splash.png.bak
# sudo cp /usr/share/pixmaps/splash/ubuntu-slick.png /usr/share/pixmaps/splash/ubuntu-slick.png.bak


Now copy the new image and replace the ubuntu-slick.png.
# sudo cp /usr/share/pixmaps/splash/ubuntu-blubuntu.png /usr/share/pixmaps/splash/ubuntu-slick.png

*Note: This will automatically change ubuntu-splash.png to the new image, because it is just a link to ubuntu-slick.png.

There you have it a nice fresh blue look throughout your system. If you are not happy with any part of it, there are many more options at Gnome-look. Check it out, your eyes will thank you. There are some very talented people out there. Thanks guys.

Monday, July 23, 2007

Stunning icon theme

Yesterday I installed a new icon theme in gnome. I'm very happy with it.

It's beautifully done, and very complete. The artist has obviously taken a long time in construction.

I don't normally play around with icons, yet I've been having trouble looking at the Ubuntu orange all the time. This is a very nice change.

The theme is called: AER-OS-XK. It's 58.96 MB. You can download it at gnome-look here: AER-OS-XK

Installing the theme
First download it. Now open Theme preferences (in Ubuntu click on: System / Preferences / Theme). In Theme preferences click the Customise Button on the right.
In the new windows that opens select the Icons tab at the top. Then click install, navigate to where you downloaded the AER-OS-XK.tar.bz2, and select it.
It will take a long time to install, as there are many icons. Yet I think it is worth it. I'm enjoying using them. I hope you do too.

Sunday, July 08, 2007

Virtualization using VirtualBox

For the past couple of days I have been playing around with VirtualBox.

VirtualBox is a family of powerful x86 virtualization products for enterprise as well as home use. Not only is VirtualBox an extremely feature rich, high performance product for enterprise customers, it is also the only professional solution that is freely available as Open Source Software under the terms of the GNU General Public License (GPL).
VirtualBox
For more information please see: About VirtualBox.

VirtualBox 1.4.0 was realised on June 5, 2007 for Windows and Linux. It now contains support for 64bit Linux Hosts, as well as better networking and storage solutions, (for full details please see: Changelog.)

I have tried a earlier version of VirtualBox, but had limited success installing it. The new version installed perfectly.
I used Automatix in Ubuntu 7.04 ("Feisty Fawn") to install it. Yet there are many other binary versions, including a beta version for OS X, (Intel Macs only). For downloads please see: VirtualBox Downloads.

So far I'm very impressed with VirtualBox. In my opinion it's the best virtualization software I have tried to date. I've found it professional, and easy to use. I feel like the programmers have really thought about how to make this a good product from a user standpoint. Also it is OpenSource, what a wonderful bonus.

There are a number of problems, (to be expected with a new piece of software). Yet each time I have gone to write a bug report; the problem has either been fixed and is available in SVN (subversion) or it's currently being fixed. That impressed me.

Unfortunately there is a problem running OpenBSD, and NetBSD as vm's (virtual machines). Yet the issue has been solved in SVN.

I'm running a FreeBSD vm and it is beautiful. I thought I might have trouble as the machine I'm running it on only has 512MB of RAM, however it's been wonderful. I wouldn't recommend any less than 512MB though. When I close VirtualBox it cleans out the RAM amazingly well.

I will write more about it, when I can install some more virtual machines to play with. I'm intrigued to see if DragonflyBSD, and Slackware will work in it.

If you would like information on installing and using VirtualBox please see:You can download VirtualBox here: Downloading VirtualBox.

EDIT: As pointed out by one of my readers VirtualBox is actually released under two licences (dual licensing). There are two versions:
The Open Source Edition (OSE) is released under the GNU General Public License V2 and:
The full VirtualBox package, which is free of charge for personal use or evaluation purposes is released under the Personal Use and Evaluation License.
For more information please see: VirtualBox Licensing FAQ.

Wednesday, July 04, 2007

Ubuntu tip: Turning off tooltips

When you hover over anything in Ubuntu Yellow boxes pop-up (Tooltips) and give you information. Personally it bugs me really badly. If you are like me; turning them off is really simple.

Note: the quotation marks are not part of the names.

First right click on the "Applications" button in the top panel, then click "Edit Menus". e.g:


When the menu editor opens click "System Tools". In the right column you will see: "Configuration Editor" Tick the box next to it, and close the menu editor. e.g:

Now click on "Applications" then "System Tools" then "Configuration Editor". Once the configuration editor opens click the arrow next to "apps", then click the arrow next to "panel". This expands the menus. e.g:

Now select the "global" folder. and in the right column untick the box next to "tooltips_enabled". e.g:

There you have it. Annoying yellow boxes gone :)

Tuesday, June 19, 2007

Microphones & Skype on Ubuntu

Today I installed Skype in Ubuntu 7.04. There can be a number of problems running Skype in Ubuntu. Yet my biggest concern was getting my microphone working.

Microphone Troubleshooting
After doing an Internet search I found the following things to try:

A) The microphone capture is turn off by default to turn it on:

  1. Double click the volume icon on the panel.
  2. Now click Edit, Preferences.
  3. You then need to make sure Microphone, Mic boost, and Capture are ticked.
  4. Now there should be a Recording/Capture tab in volume control panel.
  5. Go through each volume setting and make sure nothing is turned down or muted.
  6. In the Switches/Options tab make sure you select the Microphone as the input source.
B) Edit /etc/esound/esd.conf to look like this:
[esd]
auto_spawn=1
spawn_options=-terminate -nobeeps -as 1
spawn_wait_ms=100
# default options are used in spawned and non-spawned mode
default_options=

C)
Restart alsa-utils:
# sudo /etc/init.d/alsa-utils restart

D)
If all of the above fail you can try installing the new version of the alsa drivers. This is the only thing that worked for me:
# wget ftp://ftp.alsa-project.org/pub/driver/alsa-driver-1.0.14.tar.bz2
# tar -xjf alsa-driver-1.0.14.tar.bz2
# cd alsa-driver-1.0.14
# ./configure
# sudo make
# sudo make install


If all of these things fail you can visit: Ubuntu Forums.

For more info please see: Zero-Sum: Ubuntu Microphone Problems and solutions, and DebuggingSoundProblems

Installing Skype

I installed Skype from the Skype Repository
  1. Add the Skype repository*: deb http://download.skype.com/linux/repos/debian/ stable non-free
  2. Reload or update the package information
  3. Install Skype: # sudo apt-get install skype
Once Skype was installed I went into the options and played around with the sound device settings until they worked. Now I have Skype running in Ubuntu.

If you have problems running Skype Please see the Ubuntu community Skype page. If you need help adding a repository then please see: Repositories/Ubuntu.

**Edit 29/10/07
Update
: I've written a new post called: Microphones and Skype on Ubuntu 7.10.

Sunday, June 17, 2007

Looking at Ubuntu 7.04

I have decided to take a look at Ubuntu 7.04: Feisty Fawn. My partner Daz has been using it for a couple of weeks, and he said that he is reasonable happy with it. He said that it's not good nor bad, it just seems to work.

I just finished installing it on my computer. The installer was dodgy. After the install finished I rebooted, the system did a file system check, which failed, it booted again. Did another file system check then continued booting properly. I thought that I must have done a dodgy install, so I wiped the hard drive and reinstalled, but with the exact same results.
Yet after the final fsck I haven't had any further issues.

First impressions are; the system seems slow. Even sitting here typing now I am typing way faster than the words are appearing on the screen. The system seems to wait and be particularly slow when Firefox is open. Overall it feels very heavy.

Yet nothing has gone wrong yet. All of my hardware was detected and appears to be working. Everything else looks really good.
I'm excited to see what the view will be like from here.

Wednesday, May 16, 2007

ngircd: A simple ircd

I installed a new server today. This server will have a very light load so I am giving it many tasks. I installed Ubuntu 6.06 LTS, as I want to run VMware server on it. Unfortunately none of the BSD's can run it.

ngircd
After configuring a firewall, and hardening the system; I installed an irc daemon for an internal network. I decided to use ngircd as the daemon. I like this application, it is really easy to install and use.
To install in Ubuntu I just ran:
# sudo apt-get install ngircd
Then edited the configuration file, it is really straightforward:
# sudo vim /etc/ngircd/ngircd.conf
Now restart the daemon:
# sudo /etc/init.d/ngircd restart
After thats done just log into the server from another computer, making sure your firewall lets you through, and test that everything works properly.

Then I installed VMware server, this is also an easy process which I talk about here: VMware server on Ubuntu.
Later I will also setup a printer and scanner on this computer, which will be accessible by the whole network.

Saturday, January 20, 2007

VMware server on Ubuntu

I installed VMware server into Ubuntu 6.06 server today. It is really easy to install. These are the steps that I took:

Configuring Ubuntu:
First I did a server install of Ubuntu. Nothing fancy just a simple install. Then some simple configuration, first adding a root account, and su to root:
$ sudo passwd root
$ su

Then I added OpenSSH server:
# apt-get install openssh-server
# vi /etc/ssh/sshd_config

Next I updated the system:
# vi /etc/apt/sources.list
Commented-out: the CD, and added: The dapper universe sources
# apt-get update
# apt-get upgrade


Hardening System:
I added a simple firewall (see iptables howto for info on building a firewall rulset):
# vi /etc/init.d/iptables
# chmod +x /etc/init.d/iptables

Then removed some uneeded files:
# rm -f /etc/issue.net
# rm -f /etc/issue
# touch /root/.hushlogin
# touch /home/illy/.hushlogin
# touch /etc/skel/.hushlogin


Installing needed applications:
Then I installed some applications which the VMware install will require:
# apt-get install linux-kernel-headers libx11-6 libx11-dev libxtst6 xlibs-dev xinetd
# apt-get install gcc binutils-doc cpp-doc gcc-4.0-locales make manpages-dev autoconf automake1.9 libtool flex bison gdb gcc-doc gcc-4.0-doc libc6-dev-amd64 lib64gcc1


Installing VMware Server:
First create Directory where virtual machines will be installed. I already created mine in the install on a separate partition: /vm
Download VMware Server from: http://www.vmware.com/download/server/. You will need: VMware Server for linux (Binary tar.gz). And either the VMware server client package for windows or linux, depending on which you are going to use it on. You can also go on and install the Management Interface, yet I only want the server.
Then Install VMware:
# tar xvfz VMware-server-*.tar.gz
# cd vmware-server-distrib
# ./vmware-install.pl

Then just follow each step. It is explained quite well.

And there you have it VMware server. I can now install the client on my desktop and connect to the server and create new virtual machines. For a full Tutorial on this process please see: How To Install VMware Server On Ubuntu 6.06 LTS.

VMware Workstation, 6.0 Beta

I have been having a look at VMware Workstation, 6.0 Beta, for about a week now. After reading: Desktop Virtualization with VMware Player and Workstation, I decided that I would give it a try. I have used VMware server many times, but not Workstation.
I have been quite impressed with it. There are many very good features. Unfortunately the FreeBSD 6-Branch doesn't preform well as a guest. Yet OpenBSD runs very well as a guest, and so do many linux, and Windows operating systems.
Figure 1. The image is of OpenBSD running as a guest OS, in VMware Workstation 6 Beta.

Features
There are many features in workstation which I really like, and are very functional. Some of the new features in this release are:

  • Full support for Ubuntu 6.10 as both a guest and a host. I have tested Ubuntu 6.10 as both and it preforms very well. I was impressed.
  • There is multiple Monitor support, in which you can specify how guests see the monitors.
  • There is now support for the VIX API (formerly known as the Programming API), the API allows the writing of scripts and programs to automate virtual machines.
  • New IDE plug-ins, to Visual Studio (Windows) or Eclipse (Windows or Linux).
  • You can now run Virtual machines in the background, with Workstation closed. I really loved this feature, very handy.
  • If the guest installed supports VMware tools, then there are many features involving file transfer, and peripherals. However I was mainly testing server operation.
  • There is increased RAM support.
  • USB 2.0 Support, this works really well! I was so happy to see there there was finally 2.0 support, well done!
  • There is also support for many new guest and host operating systems, including Solaris 10 Update 3, Windows Vista, and Novel Netware 6.5 SP5, as well as many Linux OS's.
For more information on new features please see: VMware Workstation 6.0 Beta Release Notes.

Performance
I was really impressed with Workstation as a whole. It was very stable running under Ubuntu, both 6.06 and 6.10 as hosts. Most of the features that I tried worked just fine, except I could not get VNC connections to guest Operating systems to work. As I mentioned before it bothers me that FreeBSD doesn't work, but what can you do? I Love that you can create teams, I had a four computer OpenBSD cluster running inside a team, and it worked so nicely. I enjoyed playing with these features. It is a pity that the server addition doesn't have teams. I also loved being able to clone a virtual machine.

Overall Look and Feel
I always find the VMware GUI's easy to use, and simple to find my way around. The general look and feel is very comfortable. Some more complicated features are a little confusing at first but after using them you get the idea. A good knowledge of networking comes in hand with some of the more advance setups. Overall I have certainly enjoyed my experience in Workstation Beta 6.

Conclusion.
I have enjoyed working with Workstation, and I certainly think that it is worth a look if you are a developer of any sort. Or if you would like to try Virtualization on the desktop. I have to say one thing that I will certainly give VMware over some over forms of Virtualization I have tried and that is it is simple to use. Plus I really love VMware's Virtual Appliances; which are: "pre-built, pre-configured and ready-to-run software application packaged with the operating system inside a virtual machine." They are very useful, and I really appreciate the work which has been put into many of them.