
Showing posts with label Tips. Show all posts

Wednesday, January 09, 2008

DMA and Ubuntu

One of my readers is having a bit of a hard time with DVD playback, after reading my article:
Playing Encrypted DVD's in Ubuntu 7.10, he has been unable to get dvd's to playback smoothly.

One really common solution to slow, jerky, and unreliable playback is turning on DMA.
DMA stands for: Direct Memory Access. DMA allows a piece of hardware to talk directly with the RAM, reading and/or writing independent of the CPU (Central Processing Unit). In other words the hardware can use the system memory, bypassing the CPU, allowing the device to read and write much faster.

By default Ubuntu has DMA turned off (set to 0), this can be changed in the /etc/hdparm.conf file, like so:

  1. First make a backup of your hdpram file:# sudo cp /etc/hdparm.conf /etc/hdparm.conf.bak
  2. Now edit the file using your favourite text editor, I'm using gedit, however you can use the editor of you choice just change the following command to suit your needs: # sudo gedit /etc/hdparm.conf
  3. Once the file is open you will need to add the following at the end of the file:/dev/cdrom {
    dma = on
    }
  4. Once you restart your computer you should have DMA turned on.

Troubleshooting
I have been reading about a number of problems with turning DMA on. Here are a couple of solutions if DMA still doesn't work after trying the instructions above:
First try re-editing the hdpram.conf file to read /dev/dvd instead of /dev/cdrom, then restart the computer.
If you are getting the error:
`HDIO set dma failed: operation not permitted'
You may need to edit your /etc/modules.conf file, for more information please see this forum thread: #post93238.
Personally none of my systems have these issues so I can't test this solution.

I hope this proves useful to someone, have fun.

No More Beeping

*NIX Quick Tip

Beep, beep, beep,
If your like me and don't like auditory reminders, you can turning off the beeping quickly and easily:

X Windows
If you want to disable beeps in X11 (X Windows), you can turn them off with the command:
# xset b off
*Note: you will need to login as root or use sudo.

csh and tcsh
You can disable csh and tcsh shell terminal beep if you put `set nobeep' (no quotes) in your ~/.cshrc file.

This options will work on most *nix systems (using csh/tcsh or X windows), including Ubuntu, FreeBSD, and OpenBSD, however I tested this solution using FreeBSD.

Wednesday, December 12, 2007

Changing Environmental Variables

It's really handy to be able to change the way your shell works for you. Being able to add aliases, and other options makes the shell a much more powerful tool. Changing or setting environmental variables is done differently for each shell.

To change an environment variable in csh or tcsh use:$ setenv NAME "value"where NAME is the name of the variable and "value" its new value.

To change an environment variable in /bin/sh use:
$ VARIABLE="value"
$ export VARIABLE

You can permanently set environment variables for your shell by putting them in a startup file for the shell. The name of the startup file varies depending on the shell;
csh and tcsh uses .login,
bash, sh, ksh and zsh use .profile.
When using bash, sh, ksh or zsh, don't forget to export the variable.

*Note:
.login and .profile are to set conditions which apply to the whole session and to perform actions that are relevant only at login.

.cshrc and .shrc are used to set conditions and perform actions specific to the shell and to each invocation of it.
The guidelines are to set ENVIRONMENT variables in the .login, .profile file and SHELL variables in the .cshrc, .shrc files.

Saturday, December 08, 2007

7 Tips For Answering Your Tech Questions

We all come across problems in our computer ventures at some time or another. I have a number of tips that may help you find answers to your problems:

  1. Search: Searching google, or any other search engine, will often yield results, and it's always a good place to start.
  2. Search using your Error: If your problem is in relation to an error, and you have an error displayed on your screen try a search for that exact error. If someone has asked about it in a forum, or talked about it on there blog, then you will likely find your answer much more quickly.
  3. Documentation: Search the Handbook/Documentation relating to your operating system.
  4. Read the Manual: Read the manual pages relating to your problem.
  5. Mailing Lists: Search through the mailing list archives relating to your topic. You can also sign up for a number of list, and often you find solutions to problems that you haven't had yet ;-)
  6. Forums: Search the forums, relating to your distribution to see if someone else has answered your question.
  7. Ask: After exhausting all other options ask your question on a forum. Make sure that no one has asked your question before, and that you have searched every where else first. Also make sure that you place your question in an appropriate forum, in an appropriate place.
Have Fun!!!

Friday, December 07, 2007

7 Must Read OpenBSD man pages

In OpenBSD the manual pages are very important, well written documents. They comprise most of the written documentation for OpenBSD. Countless hours of work has gone into making them easy to read, and follow.

If you are new OpenBSD there a number of man pages which are a must read. These man pages can can explain much of the way that OpenBSD works, and many things that you can achieve using the system. Giving you a clearer perspective on your system.

  1. man(1): To view the manual pages you will need to use: man(1). The man(1) program displays a manual page in your terminal for you to read. For more information see: man(1).
  2. apropos(1): When your new to a system it can be difficult to know what manual page you need to read to achieve a task, enter: apropos(1). The apropos(1) program will locate and display all the commands containing a user specified keyword.
  3. hier(7): If your new to OpenBSD, or *nix systems make sure to check out the hier(7) manual page. This page details how the filesystem works, and gives you a good understanding of how the system is laid out.
  4. afterboot(8): When you first install an OpenBSD system you should check out the afterboot(8) man page. This well written man page, will tell you all the things that you should check/do after installing your system.
  5. packages(7): Once you have your system installed and configured you may want to add some software. If you would like to install binary packages check out the packages(7) man page.
  6. ports(7): If you would prefer to install software from source here is an overview of the ports(7) system.
  7. intro: If you would like to know what the numbers after the commands are, there is an explanation in the man(1) manual page, also you can read an introduction to each section here: intro(1), (2), (3), (4), (5), (6), (7), (8), (9).
Have fun Using OpenBSD :-)

Monday, December 03, 2007

Protecting Your Terminal

BSD Quick Tip
When ssh across my systems I often need to step away from the keyboard for a few minutes. This can pose a massive security threat to the system, therefore I think it's important to lock the terminal, this way I don't need to log in/out, nor leave the system insecure.

In all of the BSD's you can use a built-in utility called
lock(8). When you use:$ lockwithout any options you will be asked to enter a key twice. Then your terminal will be locked for 15 mins, after that time it will become available again.

Options:
To keep your terminal locked until you return, (no 15 minute timeout), use:$ lock -n
To use your normal user password instead of a key you enter use:$ lock -p
Personally I like to use these options all of the time, therefore I add an alias so I only have to type lock.

To Alias `lock -np` to `lock` in csh or tcsh:$ edit ~/.cshrcadd:alias lock lock -np
To Alias lock -np to lock in sh:$ edit ~/.shrcadd:alias lock='lock -np'

Sunday, December 02, 2007

Changing the Color Scheme in Gedit

Ubuntu Quick Tip
I find looking at a white background and black text a little daunting in Gedit, however in Ubuntu 7.10 (Gutsy Gibbon), you can easily change colour schemes and save your eyes. To change schemes:
In Gedit Go to Edit --> Preferences.
In the Preferences dialogue click on the Font & Colours Tab.
Then choose a scheme to suit you.

Humanise the output of OpenBSD's root mail

OpenBSD Quick Tip
I've discussed how to humanise the output of FreeBSD's root mail, and the same can be achieved in OpenBSD by running the following commands:# vi /etc/daily
change:df -klto:df -hikl

Humanise the output of FreeBSD's root mail

FreeBSD Quick Tip
The output of the root mail, daily run: disk status is in bytes, which is not quick and easy to read. To humanise this output and to show you the inodes being used do the following:
# vi /etc/periodic/daily/400.status-disks
change:df $daily_status_disks_df_flags && rc=1 || rc=3todf -hi $daily_status_disks_df_flags && rc=1 || rc=3

Thursday, November 29, 2007

Passwordless Login For SSH

I've recently set-up a new backup server, I wanted to be able to automate backups from my workstations to the server. I will be using OpenSSH (scp) as the transfer agent between the workstations and the server. By default the OpenSSH server asks for a password every time you login, therefore automation is impossible, without a bit of tweaking.

Creating an environment where passwords are unnecessary can be achieved using public-key cryptography. In this process we create unique identification between workstation (or other system) and server. The server can then recognise the user using a private/public key pair.

There are a number of steps that need to be completed, on both workstation and server, to achieve password-less logins. I have written the required server commands within the `ssh' command, to simplify the process. You will need to have a working OpenSSH server, and user login before beginning.

1. On the Workstation
On the workstation I login as the user who needs the ssh access to the server (this is really important as we are creating a key for this user.) If more than one user needs access, you will need to create keys for each user and system.

If no .ssh directory exists in users home you'll need to create one:
# mkdir ~/.ssh
# chmod 700 ~/.ssh
Now change directory into .ssh and create your ssh key (If you would like to use dsa encryption instead of rsa please use `ssh-keygen -t dsa' in the ssh-keygen command).
This text
, is used to represent your user input:
# cd ~/.ssh
# ssh-keygen -t rsa
Generating public/private rsa key pair.
Enter file in which to save the key (/home/username/.ssh/id_rsa): Press [Enter]
Enter passphrase (empty for no passphrase): Press [Enter]
Enter same passphrase again: Press [Enter]
Your identification has been saved in /home/username/.ssh/id_rsa.
Your public key has been saved in /home/username/.ssh/id_rsa.pub.
The key fingerprint is:
f3:12:g5:23:1f:b2:f7:a0:65:b1:89:72:82:f2:23:g0 username@ssh.server.tld

*Note: If you decide to use a passphrase when creating your ssh key then you will be prompted to enter your passphrase every time you login, unless you use ssh-agent. For more information please see: ssh-agent(1), http://upc.lbl.gov/docs/user/sshagent.html

2. On the server
Now we need to go to the server and prepare the environment for ssh-keys. You will need to login to the server as the user who needs the ssh access. E.g. If I login as the user kris on my workstation I need to be user kris on the server, as well (If you have a different user names on the server and workstation please see note A at the bottom of the post.)
We are going to use one command string to complete all of the jobs on the server, before being prompted for a password:
# ssh username@ssh.server.tld \
'mkdir ~/.ssh; \
chmod 0700 ~/.ssh'
Password: * * * * * *

3. On the Workstation
Now we need to copy the .pub key from our workstation to the server.
# scp ~/.ssh/id_rsa.pub username@ssh.server.tld:.ssh/MY_keys
Password: * * * * * *
id_rsa.pub 100% 397 0.4KB/s 00:00
# ssh-add
Identity added: /home/kris/.ssh/id_rsa (/home/kris/.ssh/id_rsa)

4. On the server
Now we just need to verify the file copied over, and then put it's contents in the .ssh/authorized_keys file:
# ssh username@ssh.server.tld \
'cat ~/.ssh/MY_keys >> ~/.ssh/authorized_keys; \
chmod 600 ~/.ssh/authorized_keys; \
ls ~/.ssh/'
Password: * * * * * *
My_keys authorized_keys

5. On the Workstation
Now if you go back to your workstation you should be able to login to the server without typing your password:
# ssh username@ssh.server.tldor# ssh ssh.server.tld
Notes:
Note A. If you have differing user names on the server and workstation there is an easy solution:
After creating your ssh-key (# ssh-keygen -t rsa), edit the resulting id_rsa.pub (or id_dsa.pub) file and change the user name to the user name on the server.
E.g. If I have a user kris on my workstation and a user sirk on my server I would edit the id_rsa.pub file on the workstation from this:
ssh-rsa Asdasdasdc9asdaDp5Lq8+SMdZRPzgjr65i4684xbmtrZKMQ== kris@workstation.domain.tldto this:ssh-rsa Asdasdasdc9asdaDp5Lq8+SMdZRPzgjr65i4684xbmtrZKMQ== sirk@workstation.domain.tld
Note B. If you do not have a fully qualified domain name or an /etc/hosts file detailing your workstations, and servers IP addresses, you may also need to change the domain name used in your id_rsa.pub file to a IP address.
E.g. from this:
ssh-rsa Asdasdasdc9asdaDp5Lq8+SMdZRPzgjr65i4684xbmtrZKMQ== kris@workstation.domain.tldto this:ssh-rsa Asdasdasdc9asdaDp5Lq8+SMdZRPzgjr65i4684xbmtrZKMQ== kris@192.168.0.3
Note C. If you had another server running the OpenSSH server and you wanted to login from the same workstation using the new key, just copy your id_rsa.pub (or id_dsa.pub) to each server, like in the example above, making sure to copy the contents of MY_keys to ~/.ssh/authorized_keys.

Friday, November 09, 2007

Installing New Usplash Themes in Ubuntu 7.10

There are many different looks you can give to your boot screen by adding more themes to usplash, the program which displays the splash image at boot time. You can install a number of them using Synaptic by doing a search for usplash. You can also download different themes online (see below).

Installing StartUp-Manager
Before playing with Usplash themes we need a way to easily switch between themes, enter StartUp-Manager, this program lets us control many aspects of Ubuntu's start-up including Usplash. You can install startupmanager via Synaptic or apt using the following line:
# sudo apt-get install startupmanager

Download Uspash theme
When I searched Gnome-look for Usplash I found a number of very nice themes: Usplash Themes at Gnome-Look. I quite like the Black Chrome theme. Once you have chosen one or two that you like, download them, and extract them from there archive: Right click on the archive .tar.gz and select Extract Here:

Installing Usplash Themes

  • Now we will run the StartUp-Manager to install and change usplash: System --> Administration --> StartUp-Manager
  • Go to the Appearance Tab at the top of the page, and click the Manage Usplash Themes button at the very bottom of the dialogue.
  • Now click the Add button and navigate to where you extracted your files, and select them, (They should be .so files).
  • Your new theme/s should now appear in the Themes list:
  • Close the Manage themes dialogue box.
Selecting your Usplash Theme
  • Once you have installed your themes they should appear in the scroll box under Usplash Themes in the Appearance Tab.
  • Select the theme you would like from the scroll box, just click on it and select.
  • Before you close the StartUp-Manager, check that the settings in the Boot Options Tab under Display are correct for your monitor. I had to change mine to Resolution: 1024x768, and Color Depth: 24 bits.
  • Once you have closed the StartUp-Manager wait until the post configuration has finished:When you shutdown and restart your computer you will be about to see the result, play around with a few different themes and see what you like, Have fun :-)

Wednesday, November 07, 2007

Installing Fonts in Ubuntu 7.10

Installing fonts in Ubuntu 7.10 (Gutsy Gibbon) can be done in a number of ways. Personally I like the following method, it's quick,simple and it works.

Installing some common fonts.
There are a number of very common fonts, which you can install through APT/Synaptic, including the Microsoft TrueType core fonts (e.g. Arial Black, Times New Roman).
Before installing, make sure you enable the extra repositories, (If your not sure how to do this please see: Repositories/Ubuntu).
Install the fonts:
# sudo apt-get install msttcorefonts texlive-fonts-extra
Installing Other fonts
You can also use many other fonts, like those downloaded from dafont.com. There are two options when installing: one to install them for a Single User, this means that only this user can use them, or installing them for System Wide use, so that every user on the system can use the fonts.

Single User:
Once you have downloaded and unpacked your font files (.ttf, .TTF), you will need to create a ~/.fonts if it doesn't exist.
$ mkdir ~/.fonts
Copy the font files to the .font directory:
$ cp *.ttf ~/.fonts
$ cp *.TTF ~/.fonts

Now we need tell the system about the new fonts:
$ fc-cache -f -v ~/.fonts
System Wide:
Once you have downloaded and unpacked your font files (.ttf, .TTF), we just need to move them to the font directory:
# sudo cp *.ttf /usr/local/share/fonts/
# sudo cp *.TTF /usr/local/share/fonts/

Run the following command to rebuild the font cache:
# sudo fc-cache -f -v

Saturday, November 03, 2007

Fix for No Splash in Ubuntu 7.10

After installing Ubuntu 7.10 there is no splash screen displayed at startup nor at shutdown. I just get a 'Signal Out of Range' message from my monitor.
A program called usplash controls this process, so I looked into it's configuration, the values were totally off for my monitor, which uses a resolution of: 1024x768.
By default the file looks like:
# Usplash configuration file
xres=1280
yres=1024

I edited the file:
# sudo gedit /etc/usplash.conf
I changed the xres to: xres=1024 and the yres to: yres=768.
Then I reconfigured the usplash program with the new settings:
# sudo dpkg-reconfigure usplash
Problem fixed, now the splash image displays both at startup and shutdown.

Tuesday, October 23, 2007

Turning off the Network Applet in Ubuntu

I'm not a fan of the networking applet (nm-applet) in the panel of Ubuntu. When I had a laptop and was moving networks all the time it was handy, but I'm using a desktop at the moment, and there is no easy way to turn it off. If you would like to remove it, then there are a couple of steps that you will need to follow.

  • Open the Sessions dialog; System --> Preferences --> Sessions
  • In the Startup Programs tab find the Network Manager option and untick the box.
  • Then go into the Current Sessions tab, and select the program which says 'nm-applet --sm-disable' (without quotes).
  • Click 'Remove', and then 'Apply'.
  • Now close the dialog (save if it asks you too).
  • Restart gdm (Gnome Display Manager); Close all open Applications, Then press Ctrl+Alt+Backspace.
Once you have restarted gdm the network applet will be gone.

Monday, October 22, 2007

Running Nautilus as Super User

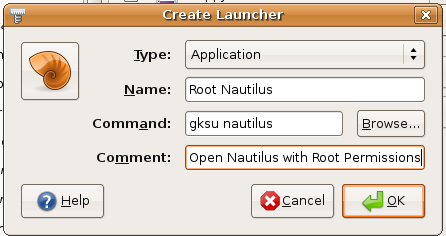
Many times in Ubuntu I've needed to move a file, or add new data to a file only to find out that I don't have high enough permissions to do so. Normally this means hitting Alt+F2 to run a command and then typing # gksu nautilus, or in a terminal typing # sudo nautilus. However there is a trick I use, which makes things much easier.

I add a menu item which runs the gksu nautilus command, and it's really easy to do.

  1. Open System --> Preferences --> Main Menu.
  2. Select "System Tools" from the list of Menus
  3. Click the "New Item" button on the right hand side.
  4. The Create Launcher box will open, fill in the boxes like this:
  5. Now click OK, and close the Menu Editor.
  6. You should now be able to select: Applications --> System Tools --> Root Nautilus, fill in your password and have a full permissions with nautilus running as Super User.

Saturday, October 20, 2007

No Window Borders in Ubuntu 7.10

When running compiz on Ubuntu 7.10 using an nVidia graphics card, with the restricted nVidia drivers installed, I loose my window borders (titlebars). There is however a temporary fix, which works just fine for me:

First make a back-up of your xorg.conf file, even though the nvidia-xconfig program makes it's own backup, it's never a bad practice to backup your files before editing them:
# sudo cp /etc/X11/xorg.conf /etc/X11/xorg.conf.BAK
Now enable the nvida glx graphics using the following command:
# sudo nvidia-xconfig --add-argb-glx-visuals -d 24

Using X configuration file: "/etc/X11/xorg.conf".
Option "AddARGBGLXVisuals" "True" added to Screen "Default Screen".
Backed up file '/etc/X11/xorg.conf' as '/etc/X11/xorg.conf.backup'
New X configuration file written to '/etc/X11/xorg.conf'

Now shutdown your computer then start again, fully restarting the system you should be able to switch compiz to normal or extras with window borders.

Playing Encrypted DVD's in Ubuntu 7.10

If you would like to play encrypted DVD's in Ubuntu 7.10 (Gutsy Gibbon) you will need to install a couple of extras, to get everything working properly.

**Edit: 22/10/07
Playing DVD's using Totem
Totem is the default movie player for Ubuntu 7.10 therefore I'll show you how to play DVD's using totem first. If you would like to use another movie player please see below.
**End edit

*Please note: We have to make a bit of a compromise running the movie player: totem, because we're installing totem-xine. This means that the totem-gstreamer plugin will be unavailable to stream media in firefox.
However there are other firefox plugins, which can do the same task.


To enable DVD playback first enable the extra repositories, especially universe and mulitverse. (If your not sure how to do this please see: Repositories/Ubuntu).
Now we can install the following plugins and applications:
# sudo apt-get install libdvdread3 totem-xine libxine1-ffmpeg
# sudo /usr/share/doc/libdvdread3/install-css.sh

Once you have restarted your system you should be able to play DVD's using totem without a hitch.

*Edit: 22/10/07
Using Other Media Players
I just wanted to add a quick note about using other media players. There are a few other really good players that you can install in Ubuntu 7.10 (a.k.a. Gutsy Gibbon) and they aren't difficult to run once you have the right plugins. If you decided to use one of these instead of totem, you won't have to worry about losing the totem-gstreamer plugin for Firefox.

To play DVD's using VLC
Enable the extra repositories, especially universe and mulitverse. (If your not sure how to do this please see: Repositories/Ubuntu).
Now install the following plugins and applications:
# sudo apt-get install libdvdread3 libxine1-ffmpeg vlc
# sudo /usr/share/doc/libdvdread3/install-css.sh

Once you have restarted your system you should be able to play DVD's using vlc.

To play DVD's using MPlayer
Enable the extra repositories, especially universe and mulitverse. (If your not sure how to do this please see: Repositories/Ubuntu).
Now install the following plugins and applications:
# sudo apt-get install libdvdread3 libxine1-ffmpeg mplayer
# sudo /usr/share/doc/libdvdread3/install-css.sh

Once you have restarted your system you should be able to play DVD's using MPlayer.

To play DVD's using xine-ui
Enable the extra repositories, especially universe and mulitverse. (If your not sure how to do this please see: Repositories/Ubuntu).
Now install the following plugins and applications:
# sudo apt-get install libdvdread3 libxine1-ffmpeg xine-ui
# sudo /usr/share/doc/libdvdread3/install-css.sh

Once you have restarted your system you should be able to play DVD's using xine-ui.
*End edit

If you need more assistance please feel free to contact me, and I'll see what I can come up with.

Disclaimer: Please check the applicable copyright laws in your country before undertaking this modification to your system, as in some countries this may be illegal.

Tuesday, October 16, 2007

FreeBSD Tip: Fixing a Sendmail Error After Removing IPv6

When I'm rebuilding my kernel in FreeBSD I comment out the INET6 option.#options INET6 # IPv6 communications protocolsI don't run anything using the IPv6 protocol so I feel it's a waste of time having it there. However this causes an error in sendmail, that you will see in your /var/log/messages file, and your root mail for example:Oct 16 01:45:12 MyKernalName sendmail[5216]: NOQUEUE: SYSERR(root): /etc/mail/sendmail.cf: line 279: Unknown address family inet6 in Family=optionand in your /var/log/debug.log file you will often see:Oct 16 01:45:12 MyKernalName kernel: drop session, too many entries
There is a really easy solution to this problem, first open the sendmail.cf file for editing, (I'm using vi, but you can use your preferred editor for this operation):# vi /etc/mail/sendmail.cfNow navigate to line #No 279 and comment it out, to look like this:#O DaemonPortOptions=Name=IPv6, Family=inet6, Modifiers=OOnce you have saved your file you'll need to reboot or restart the sendmail process so that it re-reads its config file, and your problem will be solved.

Sunday, October 14, 2007

Microphones and Skype on Ubuntu 7.10

I wrote a post a while back about getting Microphones and Skype working in Ubuntu. This has been one of my most viewed posts, and as Ubuntu 7.10 (Gutsy Gibbon) is about to be released, I thought I would update my previous post.

Turning on the Microphone
Getting the microphone working in Ubuntu 7.10, was really easy, I did the following:

  • Plugged the Microphone in.
  • Double clicked on the volume icon in the panel.
  • Clicked Edit then, Preferences.
  • Ticked the Microphone, Mic boost, and Capture boxes.
  • Once they were ticked a Recording/Capture tab and a Switches/Options tab appeared in the volume control panel.
  • I went through each volume setting and made sure nothing was turned down or muted.
  • In the Switches/Options tab select Mic Boost.
Done, the microphone worked just fine, I tested the Mic using the Sound Recorder tool found in: Applications -> Sound and Video -> Sound Recorder

Installing Skype
  • Add the Skype repository (If you don't know how to add repositories please see: Repositories/Ubuntu) deb http://download.skype.com/linux/repos/debian/ stable non-free
  • Reloaded or updated the package information
  • Install Skype: # sudo apt-get install skype
Security and Skype
I no longer have the need to use Skype, however there is a security problem with Skype running on Linux, for more information please see: http://forum.skype.com/index.php?showtopic=95261

I suggest using AppArmor, (which is now a default application on Ubuntu 7.10) to create a security profile for Skype.

Friday, October 05, 2007

Gnome Tip: Changing shortcuts in gnome-terminal

Quick Tip for anyone using gnome-terminal:
I really like using gnome-terminal, however when I went to use the ordinary copy or paste shortcuts I quickly found that the shortcuts differ from the normal old: <Ctrl>+C and <Ctrl>+P. I find this particularly annoying, but they can easily be changed.

Open the gnome-terminal and run the following two commands:
# gconftool-2 -t str -s /apps/gnome-terminal/keybindings/copy "<Control>c"
# gconftool-2 -t str -s /apps/gnome-terminal/keybindings/paste "<Control>v">

Problem solved, now you can use the normal <Ctrl>+C and <Ctrl>+P to copy and paste.